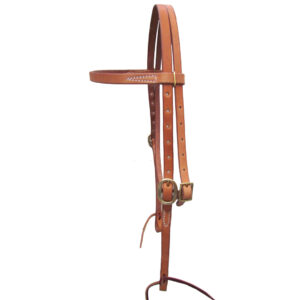
How To Attach bit to horse headstall
A basic bridle — In the horse’s head a piece of tack goes and controls the horse to tell in which direction you want to go – consisting of things like headstall, reins, bit, and cheek pieces. The bottom End of each cheekpiece is attached by a bit. The basic bridle’s piece of tack that goes on your horse’s head and guides the horse where you want him to go consists of a headstall, cheekpieces, the bit, and the reins. This is a question for many manufacturers that how to attach a bit to horse headstalls A bit attaches to the bottom end of each cheekpiece.
It’s a fairly simple method to attach a snaffle bit. Snaffles are easily used by the bridles which are English or Western.

On the horse’s head by the headstall, the bit is located. It has several components to agree with the adjustment of bit control and location comfortably.
Some functions are which work together as bridles, bit, and reins to access control on the horse’s head by the rider. The force applied by the bit pressure to the horse’s mouth. control the signals by the reinforcement of the rider’s leg and distribution of weight. A well-trained horse needs a little pressure on the bit from the skilled rider.
Attaching Snaffle Bit

The front of the snaffle bit by holding and locating it out front and folding it to half of it, joining the section in the middle we should bend the bit. Both sides of the bit are fit and smooth to work.
Do your bridles unfast to the end of the cheek pieces. It means you have to set your buckles at the end. Unfasten, untie, or unscrew if you are using the Western headstall.

At the end of the cheek pieces of the bridle at the corresponding opening insert the metal rings. Ensuring that the bridle and the bit face are in the same direction.
Metal rings of the bit around by the check pieces, refasten it. If the buckles are fastened, the bridle will be attached by the bit.
Chicago Screws
A type of screw that is widely used for a variety of purposes is called Chicago screws. To attach a headstall to a bit it is extremely popular. The thread post head on the back and the screw are the two pieces of Chicago screws. Attaching the bit by the headstall, at the ends of the cheek pieces the bit is placed, then through a hole post on the back of the head is inserted by the outside of the cheek piece whenever a screw is inserted through an inside hole.
Then the post on How To Attach a bit to horse headstall.
Chicago screws come up in a large variety of styles. It comes with a variety of lengths not only the heads are fancy, small, large, or plain.
Chicago screws need to have a post and screw through the cheek pieces of the headstall and screw securely into one another to attach a bit to a headstall securely.
Chicago Screws Pros And Cons
Pros and cons are the methods when you need to attach a bit (nose piece and bosal, etc.) to the headstall.
Pros include the simple attachment with the Chicago screws, so many varieties of designing, styles, and prices, and large availability.
Without being detected Chicago screws unscrew with the biggest con. Detaching by the bit without warning at the time of ride to allow the headstall possibly.
Steps How To Attach a Bit to horse headstall:
Frequently check the tightness: an inexpensive screwdriver keeps in your brush caddy, thick trunk, and many other locations and it will be seen often to make this simple. Whenever a screwdriver is seen, check the Chicago screws.
On a dab of glue put your Chicago screws. The next time you want to remove a Chicago screw it will be annoying, but it is during a ride better than a headstall falling. When you use glue then also check the tightness frequently.
When you give a Chicago screw as a gift to someone, you will give it as a screwdriver.
Leather Strings
For attaching a horse headstall to the bit (or anything) leather strings are also used and it is very popular to attach a bit headstall to a bit(nose piece, or bosal, etc). a bit is always placed inside at the ends of the cheek pieces, from the inside out a leather string is pushed through small holes, string tied outside.
A simple knot if necessary pulled tight over the hand if the leather strings won’t slide appropriately in an easy way.
Pros And Cons of Leather Strings
Simple attachment, wide availability, and inexpensive replacement are the pros of using leather strings.
Probably the biggest con is the riders don’t check the strings frequently and it becomes very dangerous to wear or prone to breakage or weather damage until they are replaced.
When you use leather strings with your headstall, some tips are here:
Check them often to make sure they are still tied tightly, and that they are not damaged and need replacing.
Check them repeatedly that they are not damaged and need to be replaced and they are still tied tightly.
While tying them, long leaves’ tails help to ensure that they don’t come together accidentally.
In your tack trunk brush caddy, saddle bags, or anywhere kept they will be convenient and fast to go into replacement. By the tack stores, you can buy a sack of leather strings of various sizes for use on your headstall by trimming it.
Recommend using nylon shoe strings instead of using leather. The nylon will resist weather damage and for better wearing. When you use nylon strings, keep in mind that nylon is best to slide and leather is against itself, so you need to tie a secure tight knot.


